Creating a secret is done from the Create Secret Page displayed below. This is also the landing page of the application.
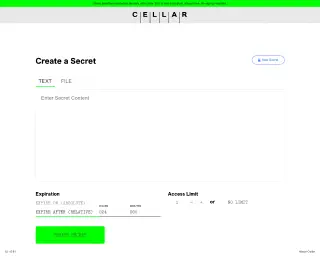
Cellar supports two types of secrets: text secrets and file secrets. Use the TEXT/FILE toggle at the top of the form to switch between modes.

For text secrets, type your secret content into the text area in the middle of the page. This is useful for passwords, API keys, configuration snippets, or any textual information you want to share securely.
INFOFile uploads are available in Cellar UI v3.0.0+ with API v2 (Cellar API v3.2.0+).
For file secrets, click the TEXT/FILE toggle and select “FILE”. You can then either:

Once selected, the file information will be displayed:

For detailed information about file size limits, supported types, and security considerations, see File Secret Details.
After entering your secret content (text or file), configure the expiration and access limit settings. These settings apply to both text and file secrets.
The expiration is the time frame in which your secret will be deleted. It must be at least 10 minutes from the time the secret is created. The maximum expiration time is configured by your administrator (default: 7 days). Once a secret has expired all trace of it will be removed and it cannot be accessed or recovered.
There are two ways to select an expiration:
An absolute expiration is the most straightforward.

Specifying a relative expiration causes the secret to expire after a certain duration relative to the secret’s creation. For example, selecting 12 hours as a relative expiration will cause a secret to expire exactly 12 hours after it was created.

The access limit is the number of times your secret content can be accessed. Accessing secret metadata (see below) does not count against this limit.
Once a secret has been accessed the specified number of times, all trace of it will be removed, and it cannot be accessed or recovered. This deletion will occur even if secret’s expiration has not been reached.

To set an access limit, enter an even number into the box labeled access limit.
This option can also be disabled. If it is disabled, the secret’s content can be accessed an unlimited number of times until it expires.
If you would like to disable the access limit, simply click the “NO LIMIT” button that appears next to the access limit field.
Administrator Limits: Your Cellar administrator may configure a maximum access limit (default: 100 accesses). If you try to set a higher limit, you will receive an error when creating the secret.
Once you have:
Click the “Create Secret” button at the bottom of the form.
If you missed anything, relevant error messages will appear. Otherwise, the secret will be created, and you will be redirected to the Secret Metadata page.